Purpose:
To have fun and show my grandson what can be accomplished with learning and a little effort.
What it Does:
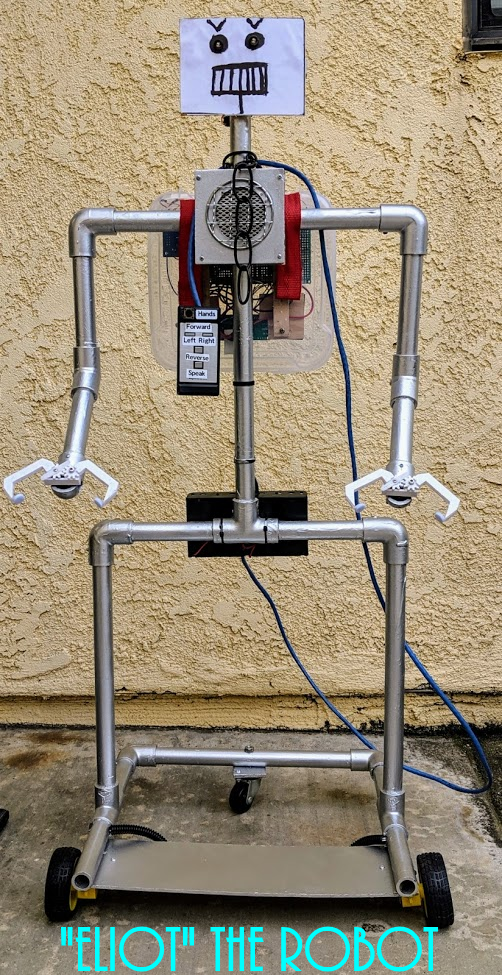
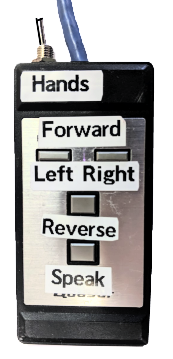
Using the remote control, it moves forward & backwards, right & left.
It blinks its eyes, talks & can grasp and holds objects with its "hands".
Background:
The robot was my 5 year old grandson Eliot's idea; “We should build a robot”.
When I told him that I thought might be too difficult, he said that we just needed directions, so he sat down and made a set of directions showing, in his 5 year old mind, how to build a robot. (See Below). The ball was now in my court - how could I not follow through?
Project Challenges:
According to Eliot it had to walk and talk.
Eliot's directions included painting, adding a battery, building (and painting) a remote control and giving it a name. Can you guess what Eliot named it?
What We Did:
How It Works:
To have fun and show my grandson what can be accomplished with learning and a little effort.
What it Does:
Using the remote control, it moves forward & backwards, right & left.
It blinks its eyes, talks & can grasp and holds objects with its "hands".
Background:
The robot was my 5 year old grandson Eliot's idea; “We should build a robot”.
When I told him that I thought might be too difficult, he said that we just needed directions, so he sat down and made a set of directions showing, in his 5 year old mind, how to build a robot. (See Below). The ball was now in my court - how could I not follow through?
Project Challenges:
According to Eliot it had to walk and talk.
Eliot's directions included painting, adding a battery, building (and painting) a remote control and giving it a name. Can you guess what Eliot named it?
What We Did:
- Eliot and I built the frame out of PVC pipe and painted it.
- Eliot drew the face.
- Blinking eyes for a touch of robot realism.
- Two motors which can be operated individually for turning, or together to go straight.
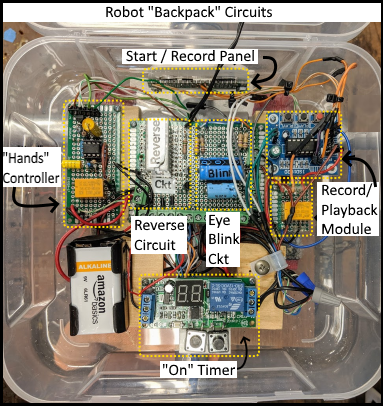
- A record/playback module supplies the voice.
- Power is from 4 "D" cells and 1 9v battery.
- I re-purposed an old VCR wired remote control that I found in my Dad's junk box.
How It Works:
- Pressing "Start" causes the eyes to start blinking and provides power to the other circuits. Automatic timeout after 15 minutes to conserve the batteries.
- The “Right” button causes the left motor to operate, turning the robot to the right.
- The “Left” button causes the right motor to operate, turning the robot to the left.
- Press “Left” & “Right” buttons together for straight ahead operation.
- The “Reverse” button activates a reversing relay powering both motors with reverse polarity.
- A "Hands" toggle switch on the remote opens and closes the "hands".
- Pressing the “Speak” button causes the record/playback module to play the recorded message.
- Press and hold the "Record" button on the "Start/Record" panel to record a new message.
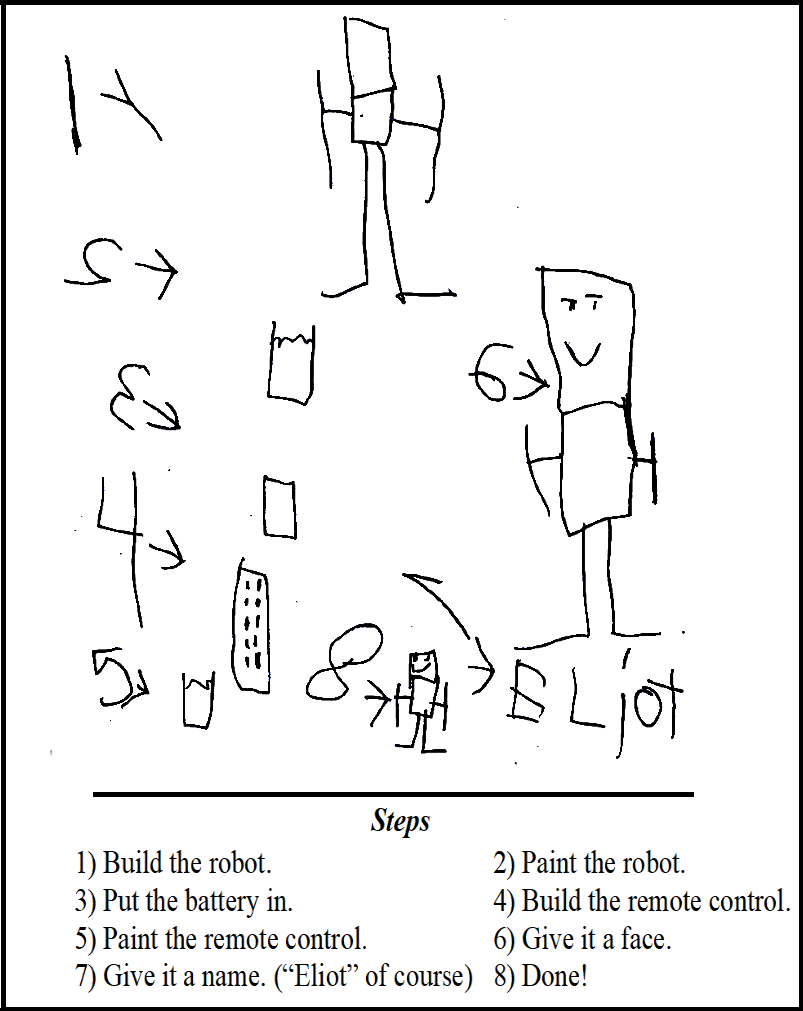
Instructions for building a robot drawn by my 5 year old grandson Eliot.
|
|

"Start" / "Record" Panel with Microphone.
Accessible from the top of the "backpack"
|
|
